512×512에서 1024×1024로: Latent Diffusion이 해상도 한계를 깬 방법
픽셀 공간 diffusion의 메모리 폭발 문제를 Latent Space가 어떻게 해결했는지. VAE 압축부터 Stable Diffusion 구조까지 완전 분석.

Latent Diffusion Models: Stable Diffusion의 핵심 원리
TL;DR: Latent Diffusion은 픽셀 공간 대신 압축된 latent 공간에서 diffusion을 수행합니다. 이로써 고해상도 이미지 생성이 실용적으로 가능해졌고, Stable Diffusion의 기반 기술이 되었습니다.
1. 왜 Latent Space인가?
1.1 픽셀 공간의 문제
DDPM/DDIM의 한계:

| 해상도 | 픽셀 수 | U-Net 파라미터 | GPU 메모리 |
|---|---|---|---|
| 64×64 | 12,288 | ~100M | ~4GB |
| 256×256 | 196,608 | ~400M | ~16GB |
| 512×512 | 786,432 | ~900M | ~40GB |
| 1024×1024 | 3,145,728 | ~2B | ~160GB |
문제: 고해상도에서 계산량이 폭발적으로 증가
1.2 핵심 통찰
Rombach et al.의 발견:
"이미지의 대부분의 정보는 저차원 구조에 있다. 고주파 디테일은 perceptually 중요하지만 semantically는 중복적이다."
직관:
- 512×512 RGB 이미지 = 786,432 차원
- 하지만 "의미 있는" 정보는 훨씬 적은 차원에 담김
- 이 압축된 표현에서 diffusion을 수행하자!
1.3 Two-Stage Approach
2. Autoencoder: 이미지 압축
2.1 VAE (Variational Autoencoder)
LDM은 VAE를 사용하여 이미지를 압축:
Encoder :
Decoder :
압축률 (Stable Diffusion):
- 입력: 512×512×3 = 786,432
- Latent: 64×64×4 = 16,384
- 48배 압축!
2.2 VAE 학습 목표
def vae_loss(x, z, x_recon, z_mean, z_logvar):
    # 1. Reconstruction Loss
    recon_loss = F.mse_loss(x_recon, x)

    # 2. Perceptual Loss (LPIPS)
    perceptual_loss = lpips(x_recon, x)

    # 3. KL Divergence (regularization)
    kl_loss = -0.5 * torch.mean(1 + z_logvar - z_mean.pow(2) - z_logvar.exp())

    # 4. Adversarial Loss (optional, for sharpness)
    adv_loss = discriminator_loss(x_recon)

    return recon_loss + 0.5 * perceptual_loss + 0.001 * kl_loss + 0.1 * adv_loss
2.3 KL-regularized Autoencoder
일반 VAE와 다른 점:
일반 VAE:
- (샘플링 필요)
- Reconstruction이 blurry할 수 있음
LDM의 KL-reg VAE:
- Very small KL weight (0.00001)
- 거의 deterministic하게 동작
- Sharp reconstruction 유지
class KLRegularizedVAE(nn.Module):
    def __init__(self, ...):
        self.encoder = Encoder(...)
        self.decoder = Decoder(...)

    def encode(self, x):
        h = self.encoder(x)
        mean, logvar = h.chunk(2, dim=1)

        # Reparameterization (학습 시)
        std = torch.exp(0.5 * logvar)
        z = mean + std * torch.randn_like(std)

        return z, mean, logvar

    def decode(self, z):
        return self.decoder(z)

    def forward(self, x):
        z, mean, logvar = self.encode(x)
        x_recon = self.decode(z)
        return x_recon, mean, logvar
2.4 VQ-VAE 대안
일부 LDM은 VQ-VAE(Vector Quantized VAE)를 사용:
장점:
- Discrete latent space
- Better reconstruction
- No posterior collapse
단점:
- Codebook 학습 필요
- 추가 복잡성
3. Latent Diffusion Process
3.1 Forward Process in Latent Space
원본 이미지 가 아닌 latent 에서 diffusion:
3.2 Reverse Process
Latent space에서 denoising:
3.3 학습 목표
def ldm_training_step(model, vae, x, condition=None):
    # 1. 이미지를 latent로 인코딩
    with torch.no_grad():
        z = vae.encode(x)

    # 2. 노이즈 추가
    t = torch.randint(0, T, (batch_size,))
    noise = torch.randn_like(z)
    z_t = sqrt(alpha_bar[t]) * z + sqrt(1 - alpha_bar[t]) * noise

    # 3. 노이즈 예측
    noise_pred = model(z_t, t, condition)

    # 4. Loss
    loss = F.mse_loss(noise_pred, noise)

    return loss
3.4 샘플링
@torch.no_grad()
def ldm_sample(model, vae, shape, condition=None, num_steps=50):
    # 1. Latent space에서 시작
    z = torch.randn(shape)  # (batch, 4, 64, 64)

    # 2. Diffusion reverse process (DDIM)
    for t in tqdm(reversed(range(num_steps))):
        noise_pred = model(z, t, condition)
        z = ddim_step(z, t, noise_pred)

    # 3. Latent을 이미지로 디코딩
    images = vae.decode(z)

    return images
4. Conditioning Mechanisms
4.1 Cross-Attention for Text Conditioning
텍스트 조건을 U-Net에 주입하는 핵심 메커니즘:
여기서:
- : Latent features에서 생성
- : Text embeddings에서 생성
class CrossAttention(nn.Module):
    def __init__(self, query_dim, context_dim, heads=8, dim_head=64):
        super().__init__()
        inner_dim = dim_head * heads

        self.to_q = nn.Linear(query_dim, inner_dim, bias=False)
        self.to_k = nn.Linear(context_dim, inner_dim, bias=False)
        self.to_v = nn.Linear(context_dim, inner_dim, bias=False)
        self.to_out = nn.Linear(inner_dim, query_dim)

        self.heads = heads
        self.scale = dim_head ** -0.5

    def forward(self, x, context):
        # x: (batch, seq_len, query_dim) - latent features
        # context: (batch, context_len, context_dim) - text embeddings

        q = self.to_q(x)
        k = self.to_k(context)
        v = self.to_v(context)

        # Multi-head reshape
        q, k, v = map(lambda t: rearrange(t, 'b n (h d) -> b h n d', h=self.heads), (q, k, v))

        # Attention
        attn = torch.matmul(q, k.transpose(-1, -2)) * self.scale
        attn = F.softmax(attn, dim=-1)

        out = torch.matmul(attn, v)
        out = rearrange(out, 'b h n d -> b n (h d)')

        return self.to_out(out)
4.2 Text Encoder
Stable Diffusion은 CLIP text encoder 사용:
class TextEncoder:
    def __init__(self, model_name="openai/clip-vit-large-patch14"):
        self.tokenizer = CLIPTokenizer.from_pretrained(model_name)
        self.model = CLIPTextModel.from_pretrained(model_name)

    def encode(self, text):
        tokens = self.tokenizer(
            text,
            padding="max_length",
            max_length=77,
            truncation=True,
            return_tensors="pt"
        )

        with torch.no_grad():
            embeddings = self.model(tokens.input_ids)[0]

        return embeddings  # (batch, 77, 768)
4.3 Classifier-Free Guidance (CFG)
조건부 생성의 품질을 높이는 핵심 기법:
여기서:
- : guidance scale (보통 7.5)
- : condition (text embedding)
- : null condition (empty text)
def cfg_sample_step(model, z_t, t, text_emb, null_emb, guidance_scale=7.5):
    # Unconditional prediction
    noise_uncond = model(z_t, t, null_emb)

    # Conditional prediction
    noise_cond = model(z_t, t, text_emb)

    # CFG combination
    noise_pred = noise_uncond + guidance_scale * (noise_cond - noise_uncond)

    return noise_pred
5. U-Net Architecture for LDM
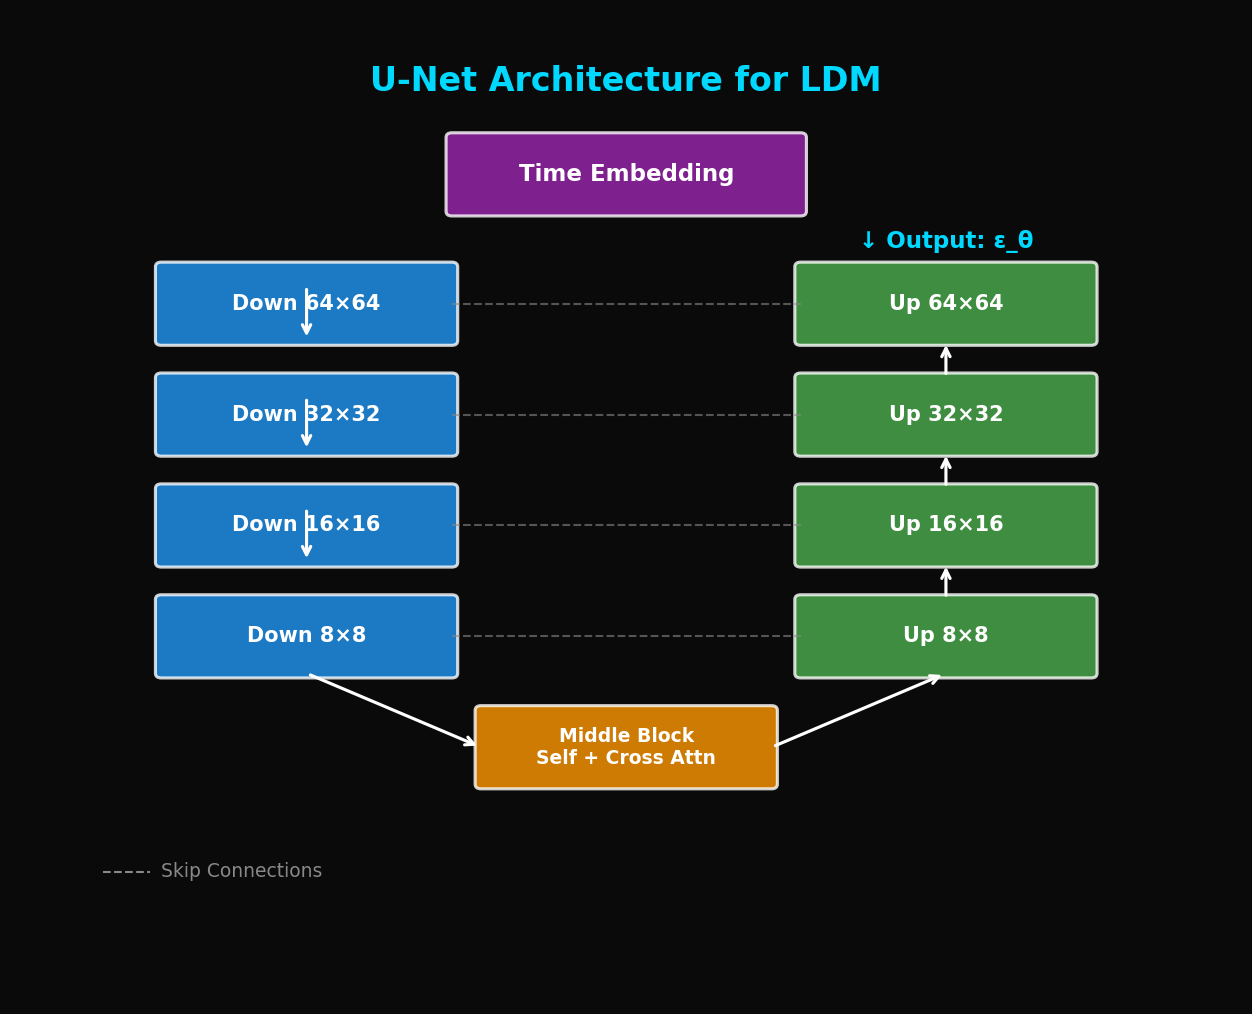
5.1 전체 구조
Input: z_t (64×64×4), t, text_emb
5.2 Transformer Block in U-Net
class BasicTransformerBlock(nn.Module):
    def __init__(self, dim, num_heads, context_dim):
        super().__init__()
        self.attn1 = CrossAttention(dim, dim, num_heads)  # Self-attention
        self.attn2 = CrossAttention(dim, context_dim, num_heads)  # Cross-attention
        self.ff = FeedForward(dim)

        self.norm1 = nn.LayerNorm(dim)
        self.norm2 = nn.LayerNorm(dim)
        self.norm3 = nn.LayerNorm(dim)

    def forward(self, x, context):
        # Self-attention (latent features attend to themselves)
        x = x + self.attn1(self.norm1(x), self.norm1(x))

        # Cross-attention (latent features attend to text)
        x = x + self.attn2(self.norm2(x), context)

        # Feed-forward
        x = x + self.ff(self.norm3(x))

        return x
5.3 ResBlock with Time Embedding
class ResBlock(nn.Module):
    def __init__(self, in_channels, out_channels, time_emb_dim):
        super().__init__()
        self.norm1 = nn.GroupNorm(32, in_channels)
        self.conv1 = nn.Conv2d(in_channels, out_channels, 3, padding=1)
        self.time_emb_proj = nn.Linear(time_emb_dim, out_channels)
        self.norm2 = nn.GroupNorm(32, out_channels)
        self.conv2 = nn.Conv2d(out_channels, out_channels, 3, padding=1)

        if in_channels != out_channels:
            self.skip_connection = nn.Conv2d(in_channels, out_channels, 1)
        else:
            self.skip_connection = nn.Identity()

    def forward(self, x, time_emb):
        h = self.norm1(x)
        h = F.silu(h)
        h = self.conv1(h)

        # Add time embedding
        h = h + self.time_emb_proj(F.silu(time_emb))[:, :, None, None]

        h = self.norm2(h)
        h = F.silu(h)
        h = self.conv2(h)

        return h + self.skip_connection(x)
6. 실험 결과
6.1 ImageNet 256×256
| Model | FID ↓ | IS ↑ | 파라미터 |
|---|---|---|---|
| BigGAN | 7.4 | 171.4 | 160M |
| ADM (pixel) | 4.59 | 186.7 | 554M |
| **LDM-4** | **3.60** | **247.7** | **400M** |
LDM이 더 적은 파라미터로 더 좋은 성능!
6.2 Text-to-Image (MS-COCO)
| Model | FID ↓ | CLIP Score ↑ |
|---|---|---|
| DALL-E | 27.5 | - |
| GLIDE | 12.2 | 0.32 |
| **Stable Diffusion** | **7.3** | **0.35** |
6.3 계산 효율성
| Method | Resolution | Training (GPU days) | Sampling Time |
|---|---|---|---|
| ADM | 256×256 | 2000 | 250s |
| **LDM** | 256×256 | **100** | **10s** |
| ADM | 512×512 | 4000+ | 500s+ |
| **LDM** | 512×512 | **200** | **15s** |
20배 효율적인 학습, 25배 빠른 샘플링
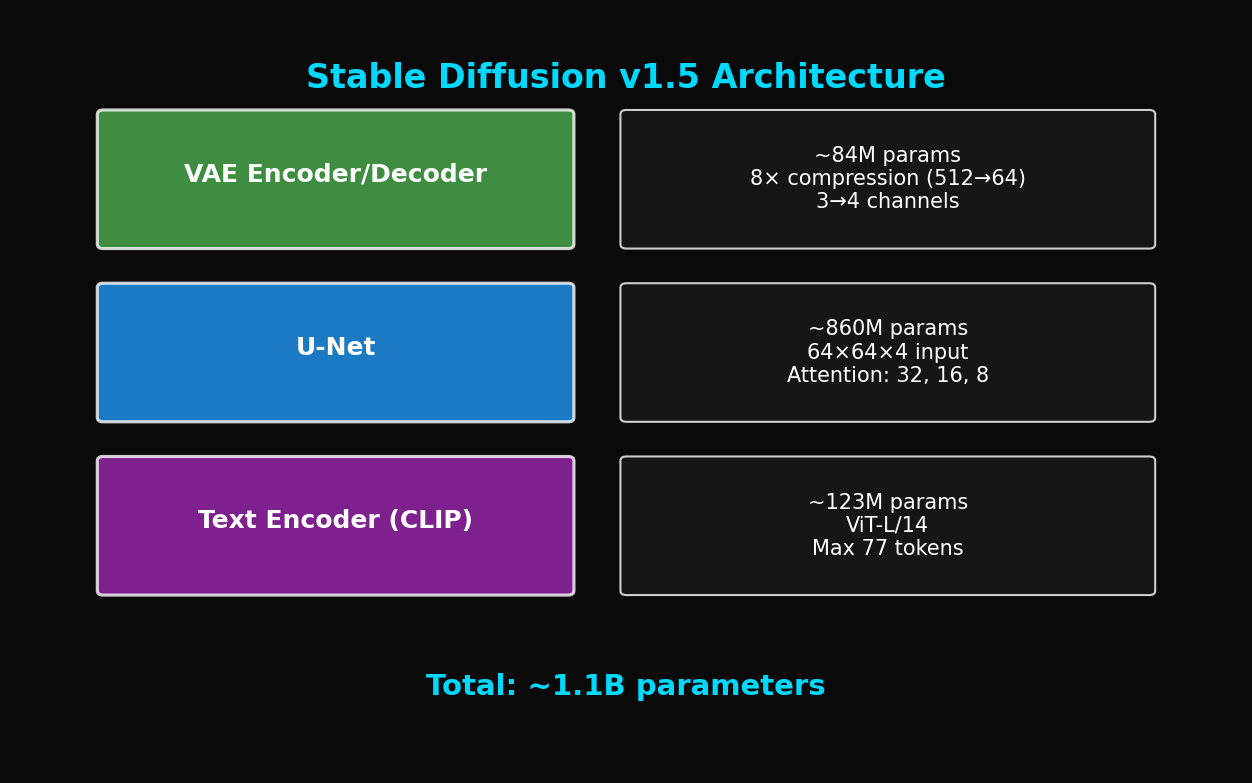
7. Stable Diffusion 아키텍처
7.1 컴포넌트 구성
7.2 완전한 파이프라인
class StableDiffusion:
    def __init__(self):
        self.vae = AutoencoderKL.from_pretrained("...")
        self.unet = UNet2DConditionModel.from_pretrained("...")
        self.text_encoder = CLIPTextModel.from_pretrained("...")
        self.scheduler = DDIMScheduler(...)

    @torch.no_grad()
    def generate(self, prompt, num_steps=50, guidance_scale=7.5):
        # 1. Text encoding
        text_emb = self.encode_text(prompt)
        null_emb = self.encode_text("")

        # 2. Initial latent
        latent = torch.randn(1, 4, 64, 64)

        # 3. Denoising loop
        self.scheduler.set_timesteps(num_steps)
        for t in self.scheduler.timesteps:
            # Classifier-free guidance
            latent_input = torch.cat([latent] * 2)
            text_input = torch.cat([null_emb, text_emb])

            noise_pred = self.unet(latent_input, t, text_input).sample
            noise_uncond, noise_cond = noise_pred.chunk(2)
            noise_pred = noise_uncond + guidance_scale * (noise_cond - noise_uncond)

            # Scheduler step
            latent = self.scheduler.step(noise_pred, t, latent).prev_sample

        # 4. Decode
        image = self.vae.decode(latent / 0.18215).sample

        return image
8. 고급 기법
8.1 ControlNet
추가 조건 (pose, edge, depth)을 주입:
class ControlNet(nn.Module):
    def __init__(self, unet):
        super().__init__()
        # U-Net의 encoder 부분 복제
        self.controlnet_encoder = copy.deepcopy(unet.encoder)

        # Zero convolution (초기화 시 zero output)
        self.zero_convs = nn.ModuleList([
            nn.Conv2d(ch, ch, 1) for ch in encoder_channels
        ])
        for conv in self.zero_convs:
            nn.init.zeros_(conv.weight)
            nn.init.zeros_(conv.bias)

    def forward(self, z_t, t, text_emb, control_image):
        # Control image를 encoder에 통과
        control_features = self.controlnet_encoder(control_image, t)

        # Zero conv 적용 후 U-Net에 더함
        control_outputs = [
            zero_conv(feat) for zero_conv, feat in zip(self.zero_convs, control_features)
        ]

        return control_outputs  # U-Net의 skip connections에 더해짐
8.2 LoRA (Low-Rank Adaptation)
효율적인 fine-tuning:
class LoRALinear(nn.Module):
    def __init__(self, original_linear, rank=4, alpha=1.0):
        super().__init__()
        self.original = original_linear
        in_features = original_linear.in_features
        out_features = original_linear.out_features

        # Low-rank matrices
        self.lora_A = nn.Parameter(torch.randn(rank, in_features) * 0.01)
        self.lora_B = nn.Parameter(torch.zeros(out_features, rank))

        self.scale = alpha / rank

    def forward(self, x):
        original_out = self.original(x)
        lora_out = (x @ self.lora_A.T) @ self.lora_B.T * self.scale
        return original_out + lora_out
8.3 SDXL 개선점
Stable Diffusion XL의 주요 변경:
| 구성요소 | SD 1.5 | SDXL |
|---|---|---|
| 해상도 | 512×512 | 1024×1024 |
| U-Net 파라미터 | 860M | 2.6B |
| Text Encoder | CLIP ViT-L | CLIP ViT-G + OpenCLIP ViT-bigG |
| Refiner | 없음 | 별도 모델 |
9. 실전 팁
9.1 Prompt Engineering
# 좋은 프롬프트 예시
good_prompt = """
a beautiful sunset over mountains,
highly detailed, 8k resolution,
professional photography,
golden hour lighting,
award winning photo
"""

# 나쁜 프롬프트 예시
bad_prompt = "sunset mountains"
9.2 Negative Prompt 활용
negative_prompt = """
blurry, low quality, distorted,
bad anatomy, watermark, signature,
out of frame, cropped
"""

# 생성 시
image = pipe(
    prompt=positive_prompt,
    negative_prompt=negative_prompt,
    guidance_scale=7.5
).images[0]
9.3 최적 파라미터
| 파라미터 | 권장 범위 | 효과 |
|---|---|---|
| guidance_scale | 7-12 | 높을수록 프롬프트 adherence ↑ |
| num_steps | 20-50 | 많을수록 품질 ↑, 속도 ↓ |
| seed | 고정 | 재현성 |
10. 결론
Latent Diffusion Models는 생성 AI의 민주화를 이끌었습니다:
- 효율성: 48배 압축으로 고해상도 가능
- 품질: SOTA FID/IS 달성
- 유연성: 다양한 conditioning 가능
- 접근성: 소비자 GPU에서 실행 가능
Stable Diffusion의 오픈소스 공개는 이미지 생성 AI의 판도를 바꿨습니다. 다음 글에서는 DiT (Diffusion Transformer)를 다룹니다: U-Net을 Transformer로 대체한 새로운 패러다임.
References
- Rombach, R., et al. (2022). High-Resolution Image Synthesis with Latent Diffusion Models. CVPR 2022
- Podell, D., et al. (2023). SDXL: Improving Latent Diffusion Models for High-Resolution Image Synthesis. arXiv
- Zhang, L., et al. (2023). Adding Conditional Control to Text-to-Image Diffusion Models. ICCV 2023
- Hu, E., et al. (2022). LoRA: Low-Rank Adaptation of Large Language Models. ICLR 2022
Tags: #Latent-Diffusion #Stable-Diffusion #VAE #Cross-Attention #CFG #Text-to-Image #딥러닝
이 글의 전체 코드는 첨부된 Jupyter Notebook에서 확인할 수 있습니다.
이메일로 받아보기
관련 포스트

SDFT: 자기 증류로 망각 없이 학습하기
복잡한 강화학습 없이, 모델이 스스로를 선생님 삼아 새로운 기술을 배우면서도 기존 능력을 유지하는 방법.

Qwen3-Max-Thinking 스냅샷 공개: 추론형 AI의 새로운 기준
최근 LLM 시장의 트렌드는 단순히 '더 많은 데이터'를 학습하는 것을 넘어, 모델이 '어떻게 생각하느냐'에 집중하고 있습니다. 알리바바 클라우드(Alibaba Cloud)가 자사의 가장 강력한 모델 Qwen3-Max-Thinking의 API 스냅샷(qwen3-max-2026-01-23)을 공개했습니다.

YOLO26: Upgrade or Hype? 완벽 가이드
2026년 1월 출시된 YOLO26의 핵심 기능, YOLO11과의 성능 비교, 그리고 실제 업그레이드 가치가 있는지 실습과 함께 분석합니다.